Saturday, October 19, 2013

Roasted Brussels Sprouts

I never thought my kids would like brussels sprouts. Never.
I'm not even quite sure why I decided to give it a try, but I did.
Boy, was I surprised that the kids actually LOVED this recipe!

Not only do they taste delicious, but the health benefits of brussels sprouts are amazing! From fighting cancer to lowering cholesterol, this is a great addition to our diet.

Roasted Brussels Sprouts

20 Brussels sprouts
1 Tbsp Olive oil
1 tsp Balsalmic vinegar
Salt and Pepper (to taste)

Preheat oven to 400 degrees.
Wash the brussels sprouts and pat them dry with a paper towel.
Cut each brussels sprout in half and place in a mixing bowl.


Add the olive oil, balsamic vinegar, salt, and pepper. Mix well.


Transfer to a baking sheet and bake in the oven for 15 - 20 minutes. 
Turn the pan midway through cooking time.


Transfer brussels sprouts to a serving platter to cool.
Once cooled, cut off the ends. (I keep the ends on right up until just before serving because it helps keep the leaves together during cooking time.)


Eat 'em up!


Sunday, September 29, 2013

Name Banners

A couple of years ago, I made a wall banner for a friend's baby shower, using scrap paper, glue, computer print-outs for the letters, yarn, and a fuzzy elephant.


I had so much fun with it, I decided to make a name banner for each of my kids.
I used scrapbook paper, butterfly cut-outs, adhesive glitter letters, glue, yarn/rope and tissue paper (for the paper flowers), all of which I purchased at Michaels.

Here is a banner for a girl:


First, trace a circle onto a piece of scrapbook paper (I prefer the double-sided ones as they are thicker and more durable.). Do this for each letter of the child's name.


Next choose a color from the packet of butterfly cutouts that you want to use. Glue one butterfly cut-out on top of each circle.


Then stick the letters of the child's name onto each butterfly cut-out.


Using a one-hole puncher, punch two holes near the top of each circle and weave the yarn/rope through the holes.


For the pink paper flowers, I watched this youtube video to make them. I made two paper flowers, one for each end of the banner.


For a boy, you can use star cut-outs instead of butterfly cut-outs (also at Michaels) and forego the paper flowers.


Monday, September 23, 2013

Scrumptious Scones

I enjoy eating scones, but I find that they are usually a bit too sweet for my taste when I purchase them from a store or bakery.

I saw this recipe online and added my own small changes to it. I was happy with the results: not too sweet and a healthier option.
You can also substitute the cranberries with blueberries. Both options taste great!

1 cup all-purpose flour
1 cup whole wheat flour (I like Trader Joe's 100% white whole wheat flour)
1 tsp chia seeds
1 tsp flaxseed meal
1/4 cup + 1 Tbsp of sugar
1 tsp baking powder
1/4 tsp baking soda
1/2 tsp salt
9 Tbsp unsalted butter, frozen
1/2 cup dried cranberries
1 (generous) tsp finely grated orange zest
1/2 cup sour cream
1 large egg
1 tsp sugar (optional)


Preheat oven to 350 degrees F.

In a medium bowl, mix flour, chia seeds, flaxseed meal, sugar, baking powder, baking soda, and salt.


Grate butter into flour mixture on the large holes of a box grater. Use your fingers to gently work in butter (mixture should resemble coarse meal), then stir in cranberries and orange zest.


In a small bowl, whisk sour cream and egg until smooth.


Using a fork, stir sour cream mixture into flour mixture until large dough clumps form. 


Use your hands to press the dough against the bowl into a ball. (The dough will be sticky in places, and there may not seem to be enough liquid at first, but as you press, the dough will come together.)


Place on a lightly floured surface and pat into a 7 - to 8 - inch circle about 3/4-inch thick. Sprinkle with remaining 1 tsp of sugar. (I personally leave out this step since I like my scones to be less sweet.)


Use a sharp knife to cut into 8 triangles. Place on a cookie sheet about 1 inch apart. 


Bake until golden, about 15 - 17 minutes. 

Cool for 5 minutes and serve warm or at room temperature.


Thursday, September 19, 2013

Kale, Kale, Kale!

I'm sure you have heard all the rave about kale by now. Kale has many wonderful benefits, particularly its powerful effects in battling and preventing cancer.

Here are a few ways in which my family and I incorporate kale into our diet. As it so happens, all of these recipes are also gluten-free.

Kale chips

I have made kale chips before but wasn't thrilled with the results. After reading a friend's post about kale chips needing to be absolutely dry, I decided to give it a try again....And loved it!

1 bunch of kale
1 Tbsp olive oil
2 tsp of balsamic vinegar
salt to taste (optional)

I followed these directions (slightly adapted):

Preheat oven to 325 degrees F and line a baking sheet with parchment paper.
Rinse kale and dry well, using a salad spinner or drying by hand with paper towels.
Toss kale in just enough olive oil for a light coating, about 1 Tbsp.
Add balsamic vinegar (and salt, optional) and mix well.


Lay kale in a single layer on the lined baking sheet.


Bake for about 15 minutes.
Check regularly as the kale chips can go from not-quite-done to overdone quickly.
Eat immediately and store leftovers in an airtight container to keep them crisp.


Sauteed Kale

Kale
Soy sauce (I like to use organic gluten-free soy sauce. It has a lighter taste than regular soy sauce.)
Coconut oil
Sliced almonds
Shredded coconut (optional)

Directions:
Warm coconut oil in a pan. Place kale in the pan and sprinkle with a "dash" of soy sauce (just enough to taste).
Cook until kale is tender.
Place on a serving dish/bowl and top with sliced almonds and shredded coconut.


Kale Smoothie

Place various fruits and vegetables with kale (of course) into a blender.
Here is a sample recipe that I like:

Bananas
Strawberries
Blueberries
Cooked carrots
Kale
Greek yogurt
Milk
Raw Honey (optional)

Place fruit and vegetables into a blender.


Add greek yogurt (and raw honey, optional) and 4-5 ice cubes.
Add enough milk to blend everything together.
Blend well and serve immediately.


Tuesday, August 27, 2013

Savory Chicken Nuggets

I have been looking for a recipe for chicken nuggets that are egg-free and yet moist and flavorful.
This recipe is all of those!
I've made a few adjustments, but here it is:
(I have also included a gluten-free and/or dairy-free option at the bottom of this post!)

Ingredients:

3 skinless, boneless chicken breasts
1/3 cup Italian seasoned bread crumbs (I use Trader Joe's bread crumbs and add my own Italian seasonings)
3 Tbsp grated Parmesan cheese
1/3 tsp salt
1/3 tsp dried thyme
1 tsp dried basil
1/4 cup butter, melted


Cut up chicken breasts into 1 1/2 inch sized pieces. Soak in milk or buttermilk overnight in refrigerator.


Preheat oven to 400 degrees F.

In a bowl, mix together the bread crumbs, cheese, salt, thyme, and basil. Put melted butter in a separate bowl for dipping.

Dip chicken pieces into the melted butter first, then coat with the breadcrumb mixture. Place the well-coated chicken pieces on a baking sheet in a single layer.


Bake in the preheated oven for about 20 minutes, turning the baking sheet halfway during baking time.


These go great with a side of fries, like these.  Enjoy!

* For an dairy-free option, soak the chicken pieces overnight in coconut milk instead of milk, and leave out the butter and parmesan cheese. They still taste great! 

* For a gluten-free option, use gluten-free bread crumbs, such as Glutino.
I have made these nuggets in a gluten-free and dairy-free form, using gluten-free bread crumbs, coconut milk, spices, and salt. They were still delicious!


Thursday, August 15, 2013

Day Trip To Toys "R" Us

It was time to get a new bicycle for my oldest daughter. She was outgrowing her bicycle and my youngest daughter would then take over the "old" bicycle.

We decided to head over to Toys "R" Us.
I noticed that all of the bicycles in the size we were looking for ranged from $70 - $80.
I was excited when I saw a bicycle for only $49.99! Plus, my daughter's favorite color is purple, so I thought this was perfect!


When I took the slip to the cash register, I was told that the one on display was the only one left. I wasn't sure what to make of that, until he said that I would receive a 30% off discount since it was the one on display. He assured me that he would check the bicycle to make sure that none of the parts are missing, etc.

Plus, I had a 15% off coupon, which I had gotten off their website and printed out before our trip. After all the discounts, the cost of the bicycle came out to $29.74 + tax. Not bad compared to $49.99, or even the other bicycles for $70 - $80.

In that same trip, I also picked out a princess costume for my youngest daughter, whose birthday is coming up (she has been wanting one for months). Actually, I let my daughter pick out the costume and fortunately, the one she picked out came with an accessory set of a tiara, a pair of earrings, and a purse.


This particular set was $19.99, but I noticed that one of the gems was missing. I asked the cashier about this, who said that this was the only one left. I asked for a discount and he said they normally give a 15% off discount, but he gave me a 30% off discount, for some reason.

Again, I had a 15% off coupon! After all the discounts, I paid $11.89 + tax for the princess costume set.

Additional savings = Happy mom!
The cashier, who was an assistant manager told me that there were 2 coupons circulating. One was 15% off of one item, and the other was 15% off the entire purchase. Fortunately, I had the latter!
So, if you're taking a trip to Toys "R" Us (or anywhere for that matter), check their website for any coupons, and always ask for discounts if you see a reason for one!


Sunday, August 11, 2013

French Fries Craze!

I love french fries, and so do my kids....I mean, who doesn't??

During the past couple of months, I have been looking for recipes for homemade, healthier options for fries to serve to my family.
Here are three of my favorite recipes.
(These are all gluten-free recipes, and I have also included dairy-free/vegan options for each recipe.)


Baked French Fries
(I only made slight changes to the original recipe.)

Ingredients:

3 large baking potatoes
1 tablespoon olive oil
1/2 teaspoon paprika
1/2 teaspoon garlic powder
1/2 teaspoon chili powder
1/2 teaspoon onion powder
salt to taste (optional)

Directions:

Preheat oven to 425 degrees F.

Cut potato into thin wedges and place in large mixing bowl. Coat potatoes with oil and spices. 


Place on a baking sheet and bake for 15-20 minutes in preheated oven until golden brown.


Enjoy! 


Herbed Potato Wedges
(Again, I didn't make many changes to the original recipe.)

2 potatoes
2 tsp of olive oil
1/4 tsp of garlic powder
1/4 tsp of black pepper
1/4 tsp basil
1/4 tsp salt
1/4 cup of parmesan cheese (Omit this for a dairy-free/vegan option.)

Directions:

Preheat oven to 400 degrees F.
Cut potato into thin wedges and place in large mixing bowl. Coat potatoes with oil and spices.
Place on a baking sheet and bake for 15-20 minutes in preheated oven until golden brown.


Sweet Potato Fries

A good friend of mine passed this recipe along to me. I made the fries without the dip and loved it! You can also add some spices like salt, pepper, and cayenne pepper if you wish.

Since I didn't make any changes to the original recipe, you can check out the recipe here.


Friday, August 9, 2013

Shop Your Way Rewards

Update (5/30/14):
Instead of receiving emails that state that I have surprise points toward any purchase, I now receive emails stating that I have surprise points toward a clothing purchase only. 


I have never really shopped at Sears until about a year ago.
I somehow joined a program they offer, called Shop Your Way Rewards, which is free of fees, etc.
It includes Kmart as well as Sears. I haven't really used the points at Kmart, so I'm not exactly sure how it works at Kmart. I've only used my points at Sears, so I will be sharing from my experiences at Sears.

I started to shop at Sears because I began receiving emails from the Shop Your Way Rewards program saying that I have $4 on my account. No minimum required. I have been getting these emails about twice a month or so. In addition, you can also rack up points (every 1,000 points = $1).
Here is the email I receive every couple of weeks:


Congratulations!
You have been awarded $4 worth of surprise points (4,000 points) to your account for being our valued member.
HURRY! These points are valid 9/26/13 - 10/02/13.

You can redeem them towards any Sears purchase, in store or online. 

I know that a lot of stores offer similar programs, such as Kohl's, Famous Footwear, DSW, etc. However, I rarely shop at Kohl's because I don't live near one, and I often don't want or need anything at Famous Footwear, DSW and many of the other stores that offer a similar program.

Sears, on the other hand, has a large array of items to choose from: clothing, kitchenware, toys, candy, hardware, electronics, etc. I often find things at Sears that I need and/or get small things that I don't necessarily need but don't pay anything/much for.

The first time I went to Sears, I bought 3 packs of socks for $1.98, but I didn't have to pay anything since I had $6 on my account.

About a month ago, I discovered a small clearance section (it's not always there). I found a King sized bed skirt (original price was $49.99) on clearance for $1.99. I also purchased 2 King sized pillow covers (original price was $29.99) also on clearance for $1.99. Again, I paid nothing since I had $4 on my account. What a steal!

When I don't find anything that I necessarily need, I look for something fun for the kids.
Today I went to Sears and paid $0.37 for these (after using $4 on my account):


A pack of two necklaces and a pack of two bracelets. Perfect for my two daughters. Plus, my youngest daughter's birthday is coming up! It even beats the dollar store, both in price and in quality!

Sometimes I don't have the motivation to go to Sears and use the $4 they put onto my account 1-2 times a month  (for doing nothing might I add), but when I do find the time and energy to go to Sears, I always come home glad that I did, even if they are small items.

Update:
I finally went around to Kmart to use my Shop Your Way rewards points, and it worked the same as Sears.
I was able to get a Ninja Turtle toy camera and some peanuts without paying a cent!
Not a big purchase, but I plan on returning to Kmart with my Shop Your Way reward points during the next few months to stock up on Christmas presents for the kids. Shopping for 3 kids for Christmas can add up!

2nd Update:
My daughter needed a new backpack for school. I wasn't thrilled about purchasing a new backpack considering the one she was using was relatively new. However, the zipper broke, making the backpack useless. I was concerned that this would happen again to the new back pack, but she needed a backpack, so we set out to Kmart.

Thankfully Kmart had some backpacks on sale, and my daughter picked one out originally priced at $17.99. The sale price brought it down to $9. I had recently received an email saying that I had $7 of surprise points added to my account for being a member. (I usually get only $4, but from time to time I will receive $7 or $8.)

I used my $7.45 Shop Your Way rewards points ($7 from the surprise points simply being a member and 45 cents came from points racked up from previous purchases.) and thus only had to pay $1.55 plus tax! 

Needless to say, my daughter and I both came out of the store very pleased!


Tuesday, August 6, 2013

All-Natural Soaps

Ever since I learned that sodium laureate (found in many products such as soaps, shampoos, and toothpastes) can cause irritation, I've been on the search for all-natural soaps.
As my kids all have varying degrees of eczema. I wanted to try out an all-natural soap to see if it would help their eczema in any way. Sure enough, I have seen some improvements in their skin, once we've made the switch.

For our hands, we use Dr. Bronner's Baby Mild Castile Soap. You only need about 1 tablespoon of Dr. Bronner's castile liquid soap mixed in water and use as you would in a soap dispenser. Castile soap actually has many different uses, as shown here, but we personally only use it as handsoap. I just can't get used to using it for other means as of now.


As for baths, we have found Dr. Bronner's Baby Mild castile soap, both in the liquid version and the bar soap to be quite drying. I was looking for an all-natural soap that was moisturizing since my kids have dry skin. I have found  Nubian Heritage Shea Butter Bar Soap to be very moisturizing and the size is larger than the average bar soap, off-setting the cost a bit.


My youngest, however, seems to have a sensitivity/allergy to shea butter, so I went on yet another search for an all-natural and moisturizing bar soap for bath time, but without shea butter.
We have discovered Mother's Special Blend Soap. It uses cocoa butter instead of shea butter, and it is silky, smooth, and moisturizing. I just wish the size was larger, as it is smaller than the average bar soap.


At first I was discouraged when I was looking for an all-natural bar soap as they don't come cheap! I certainly didn't want to be buying soap after soap after soap, trying to find one moisturizing enough. Thus, I was relieved that the search didn't take long for us to find ones that met our needs (Thank goodness for product reviews!).
I hope you find these helpful for those of you searching for good all-natural soaps!

Update: 
The Mother's Special Blend Cocoa Butter Soap seems to burn when getting into the eyes. My 7 year old is fine with it, but my toddler isn't liking it very much for her face. We've been using our old soap (Cetaphil gentle cleanser) just for her face and continuing to use Mother's Special Blend Cocoa Butter Soap for the rest of her body.

Monday, July 22, 2013

Free Kids' Building Workshops

I love finding free activities for kids, especially since I have three kids and it can get costly!

I have recently discovered that Home Depot and Lowe's offer free kids' workshops!


Home Depot offers free workshops on the first Saturday of every month (Here for more information.).
Lowe's also offers free workshops about twice a month (Here for more information.).

I have been to the Home Depot workshops three times, and only once to Lowe's. They have a few differences which I will share.

Home Depot supplies aprons and refreshments, which varies but usually includes Capri-sun, water, popcorn, and granola bars. Their projects are a bit simpler than Lowe's but still takes time and effort, and my kids love the end-results.
Below are pictures of some of the projects we have brought home from Home Depot.

The first project is a take-home mini-garden. First we built the plant holders using a hammer and nails (younger kids will need parental assistance). Then the kids painted them. Finally, each child could pick two different potted plants (There were three different kinds to choose from: Marigold, Polka dots, and Snap dragon.).


The second project was a lawnmower pencil holder. First we built it using a hammer, nails, and glue. Then the kids painted them. 


The third project was a bit more complicated: a car sponsored by Despicable Me 2. First we built the car using hammer, nails, and glue. Then the kids painted them and put stickers on once the paint had dried. 


Lowe's supplies aprons but did not offer any refreshments the one time we participated in their workshop. However, their projects are more appealing (in my opinion) than the ones that Home Depot offers. 
Here is a picture of the project from Lowe's:


It is a treasure chest sponsored by Monsters University. First, we built it using a hammer and nails. Then the kids put the stickers on. They were excited to put things inside the treasure chest. Although they didn't offer any refreshments or even paint, we spent more time building this treasure chest than on any project we did at Home Depot.

Overall, I like the projects that they offer at Lowe's. However, Lowe's requires an online reservation, and the spots fill up very quickly. In addition, they don't say what the dates are to sign up. You just have to keep checking their website. As a result, we haven't been able to attend their workshops on occasion because their workshops are already full!

Home Depot's projects are simpler, but the kids still really enjoy them. They have a more relaxed atmosphere - offering refreshments, balloons, and you don't have to sign up before-hand.

Both Home Depot and Lowe's are great learning opportunities for kids to build projects. My family and I really enjoy these free workshops!

Saturday, July 13, 2013

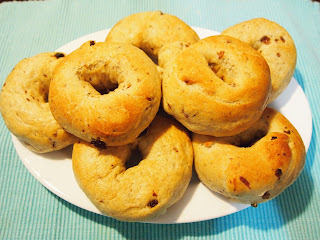
New York Style Raisin Bagels

One of the things I've missed since moving away from the east coast are New York style bagels.


I have adapted this recipe for a healthier option, and it still tastes scrumptious!
My kids don't even notice the changes I've made and even request it!

I have only made these bagels using a bread machine. The original recipe includes instructions on how to make this bagel by hand if you don't have a bread machine.

Ingredients:

1 1/4 cup of Water
1 1/4 cup of Whole Wheat flour (I like Trader Joe's 100% White Whole Wheat Flour.)
2 1/2 cup of Bread flour
2 Tbsp of Sugar
1.5 tsp of Salt
1.5 tsp of Active Dry Yeast
1/4 cup of Raisins
1 tsp (or more) of Chia seeds
1 tsp (or more) of Flax seeds


Place the ingredients into the Bread Machine container as instructed in the manual.
(With some bread machines, the 
wet ingredients are placed first, and then the dry ingredients, except the active dry yeast. Make a small "well" in the middle of the ingredients, and place the active dry yeast into the well.) Set option to "Dough".

Once the dough in the bread machine is ready, begin boiling water (about 4 quarts) in a large pot. 

Preheat oven to 350 degrees. (Oven temperatures may vary.)

Line a baking sheet with parchment paper or lightly oil the baking sheet.

Place the dough on a lightly floured work surface.

Divide dough into 8 balls (or more for smaller bagels). Press thumb down into center of each ball and push through to make a hole. Gently pull with fingers to make the hole bigger.


Add 2-3 bagels at a time to the pot of boiling water. Boil about 1 minute on each side. Using a slotted spoon, remove bagels from the pot of boiling water and place on a baking sheet lined with parchment paper or lightly oiled.


Brush the tops of each bagel with melted butter (optional).

Bake in the oven for 15 - 20 minutes until lightly golden brown.


Cool on a wire rack and enjoy!