Sunday, December 14, 2014

D.I.Y. Braided Headbands


I recently ran across this tutorial for a braided headband.
Not only are these super cute, but they are also really fun to make! Even my 8 year old joined in the fun!
The best part is we didn't have to buy any of the supplies that were needed!
All you need is a t-shirt (you can re-purpose an old one), a pair of scissors, measuring tape/ruler, thread, and sewing needle.

We made a variety of headbands, some 3-stranded and some 4-stranded, of various colors and thickness.
Although I didn't like the way they looked on myself, I thought they looked great on my daughters.
We also made some as gifts, perfect for the upcoming holiday season.

I followed the steps in the tutorial almost exactly, except that I used strips that measured 3/4 inch wide for 4-stranded thicker headbands, and 1/2 inch for 3-stranded thinner headbands.

Happy Braiding!


Sunday, April 27, 2014

D.I.Y. Lego Favor Bags

I posted about throwing a Lego-themed birthday party for my son and daughter here.

At the end of the party, we gave each guest a Lego favor bag (based on this). Each bag consisted of lego mini-figure crayons and a mini lego coloring book.


Here is how I assembled each bag:

First, we made lego mini-figure crayons.
We purchased the mold from www.amazon.com. The kids helped peel and break the crayons, and we melted the crayons in the oven, letting them cool until ready. (Detailed instructions here.)


Next, I made mini lego coloring books, using the template from here.
I added the words "Lego coloring book" to the cover and stapled the pages together rather than sewing them together (much easier!).


I used the same template that was used for the party invitations to seal the bags, erased all the words and lego figure, and typed in "Thank you for coming!" instead.
I printed this out onto white cardstock,


I assembled the crayons and the coloring books into the clear plastic bags that I bought from Jo-Ann fabric and crafts store.


To seal the bags, I folded each cardstock in half horizontally and stapled it to each clear plastic.


Super fun to do!

A Lego Party

My son and daughter LOVE Legos. So this year we decided to throw them a Lego birthday party!


I found a ton of ideas on Pinterest, but I knew right off the bat that I didn't want to spend too much time on this.
After looking at the myriad of ideas, I tried to pick out the ones that I thought might take less time to work on.

First came the invitations.
I used this template from here and put in our own birthday party information.


Next I worked on the decorations.
I didn't want to waste printer ink, so I made a lego banner based on a template from here using cardstock, glue, yarn, clothespins, and wall-mounting hooks.


Next, I worked on table decorations.

I made a Lego boy and a Lego girl to display my kids' names and ages based on this picture. However, the link wasn't working for me, so I made my own cut outs, using card-stock and glue. These stayed up great indoors, but not so much outdoors. I ended up taping them up after repeated falls.


I had the kids build utensil holders out of legos (I got the idea from Pinterest of course.).


I also drew faces on yellow paper cups that I bought from the dollar store to add to the Lego decor. (I got the idea from here.)


Lego activities and games are always fun, so we did three simple ones:

Guess how many Lego pieces there are (Again, the idea is from Pinterest),


Pin the head on the Lego man (from Pinterest) - a hit with the kids,


and Lego masks.

I used this template and pasted it into Microsoft Word. I wanted to turn this into a craft so I erased the eyebrows and mouth in Microsoft Word and printed the masks out onto yellow file folders (I found cardstock to be too flimsy.)
I cut out the eyes so the kids could see and set out elastic string to tie on at the end.
To make this a craft, I set out 4 different types of eyebrows (that I cut out beforehand), furry moustaches (from the dollar store), and permanent markers to draw mouths.
Some of the girls drew red mouths and added eyelashes to the eyes to create a girl lego mask.


The masks made for a great group photo!


We completed the day with cupcakes topped with lego candy of course!
(We bought the candy from Toys r us, but they are also available on www.amazon.com.)


Each guest left with a favor bag (based on this), which consisted of lego mini-figure crayons and a mini lego coloring book.
Here is my post on how to assemble these favor bags.
My kids helped peel and break the crayons to make the lego crayons, and I used the same template that we used for the invitations to seal the bags. However, I erased the words and the lego figure and typed in "Thank you for coming" instead.


The kids had a ton of fun and so did I!


Saturday, March 1, 2014

Painting Vases with Chalk Paint

I have so many vases lying around our home not being put to use that I decided to paint some of them.

I began by washing the vase.
Once it was dry, I painted the inside of the vase with Provence chalk paint.
(I wrote about Annie Sloan chalk paint in this post.)

After the paint dried, I painted a second coat.


Throw in some flowers and there you have it!


Another Chalk Paint Project

In my last post, I blogged about Annie Sloan Chalk paint.

Well, I loved using chalk paint so much that I decided to paint an end table that someone gave to me in college.


The transformation after using Provence chalk paint:


I began by sanding everything down with a 220 grit sanding block. With chalk paint, it isn't necessary to sand down or even prime before applying paint, but I ended up sanding anyway because this piece of furniture was particularly scratched up.


I then spray painted with Rust-Oleum metallic spray paint to create a distressed look. I only spray painted the edges as these were the areas where I wanted the metallic paint to show.


Once this dried, I applied a coat of Provence chalk paint to most of the furniture using a Purdy 2.5 inch brush. I left some of the spray-painted parts unpainted to make sure it'll show. I also sanded down the edges where I wanted to create the distressed look.


At this point, I could have been finished with the chalk paint. However, since I only wanted to create a subtle distressed look, I painted a second coat, again avoiding some of the spray-painted parts to show. I sanded down the edges again to have the metallic color pop out.


After everything was dry, I applied a coat of Annie Sloan clear wax, making sure I wiped off any excess wax as I went along.


I love this color and the character it adds to our living room!


Tuesday, February 25, 2014

Annie Sloan Chalk Paint

For the past seven years, I have held back on home decorating for various reasons, financial, time, etc.
Recently, however, I have been learning about various D.I.Y. projects that have made it much more affordable to decorate my home.

I purchased a few items from a great local thrift store and decided to paint them.
My first project was a tv console that I purchased for only $16 from my favorite thrift store. It was extremely heavy, but it was so worth it!

Once I found the items I wanted to paint, I set out to look for which paint to use.
After much research, I ended up trying out Annie Sloan chalk paint. (Here is a tutorial that shows her technique.)
I am now a huge fan of chalk paint! It not only allows you to create a distressed look, it is also much quicker and easier to use than most other types of paint.
Chalk paint is also nearly odorless (Although the clear wax has a strong odor that I find difficult to withstand.) and Annie Sloan claims that it is organic.

This is what the console looked like when I brought it home from the thrift store.


This is the console after using chalk paint.


The first thing that I did was remove all the doors and handles and set them aside.


Next, I sanded everything down with a 220 grit sanding block. With chalk paint, it isn't necessary to sand down or even prime before applying paint, but I ended up sanding anyway because this piece of furniture was particularly scratched up.


I then spray painted with Rust-Oleum metallic spray paint to create a distressed look. I only spray painted the edges, as these were the areas where I wanted the metallic paint to show.


Once this dried, I applied a coat of Paris Grey chalk paint to most of the furniture using a Purdy 2.5 inch brush. I left some of the spray-painted parts unpainted to make sure it'll show. I also sanded down the edges where I wanted to create the distressed look.


At this point, I could have been finished with the chalk paint. However, since I only wanted to create a subtle distressed look, I painted a second coat, again avoiding some of the spray-painted parts to show. I sanded down the edges again to have the metallic color pop out.

After everything was dry, I applied a coat of Annie Sloan clear wax, making sure I wiped off any excess wax as I went along.


I repeated this entire process for the doors after covering the parts that I didn't want paint to get on.


I also changed the fabric on the doors using a staple gun, to give it a fresher look. 
Here is what the door looked like before the changes:


Here is the door after the changes:


Now it was time to put the doors and handles back on the console and put it to use!


Friday, February 7, 2014

Dining Chair Makeover

I have long wanted to give my dining chairs a makeover.
The seats were ruined with watermarks and the foam had been damaged by kids' booster seats.
Even the fabric had been torn.
This was in need of a major fix-up!


Here is what it looks like after the work was complete.


First, I set out to get my supplies:

  • Staple Gun
  • Staples
  • Fabric
  • Foam
  • Scissors
  • Measuring tape

I went to Home Depot to get the staple gun ($8.87) and staples ($2.67), as well as the foam ($5.99 per foam). There are different sizes of foam, but I found this one to be the most cost-effective (I even compared the price to Jo-Ann's foam): 


I went to Jo-Ann's to look for fabric and was surprised that I was having a hard time finding fabric that I liked. I narrowed my choices down to two different pieces of fabric, one of them would have come out to about $25 and the other about $40 (both were 50% off).
I still wasn't satisfied with either the fabric or the price.
A couple of days later, I happened to be at Target and purchased a tablecloth on clearance for $7.88.
I realized that this would be perfect for my chair covers!
Not only was I much happier with this pattern, but the cost was significantly cheaper than any fabric at Jo-Ann's!


Now begins the actual work.
I removed the seats from the chairs by removing the screws.


I measured the seat cover that was originally in place with my measuring tape.
Then, I measured and cut out 6 squares from the fabric that would replace the old seat covers.

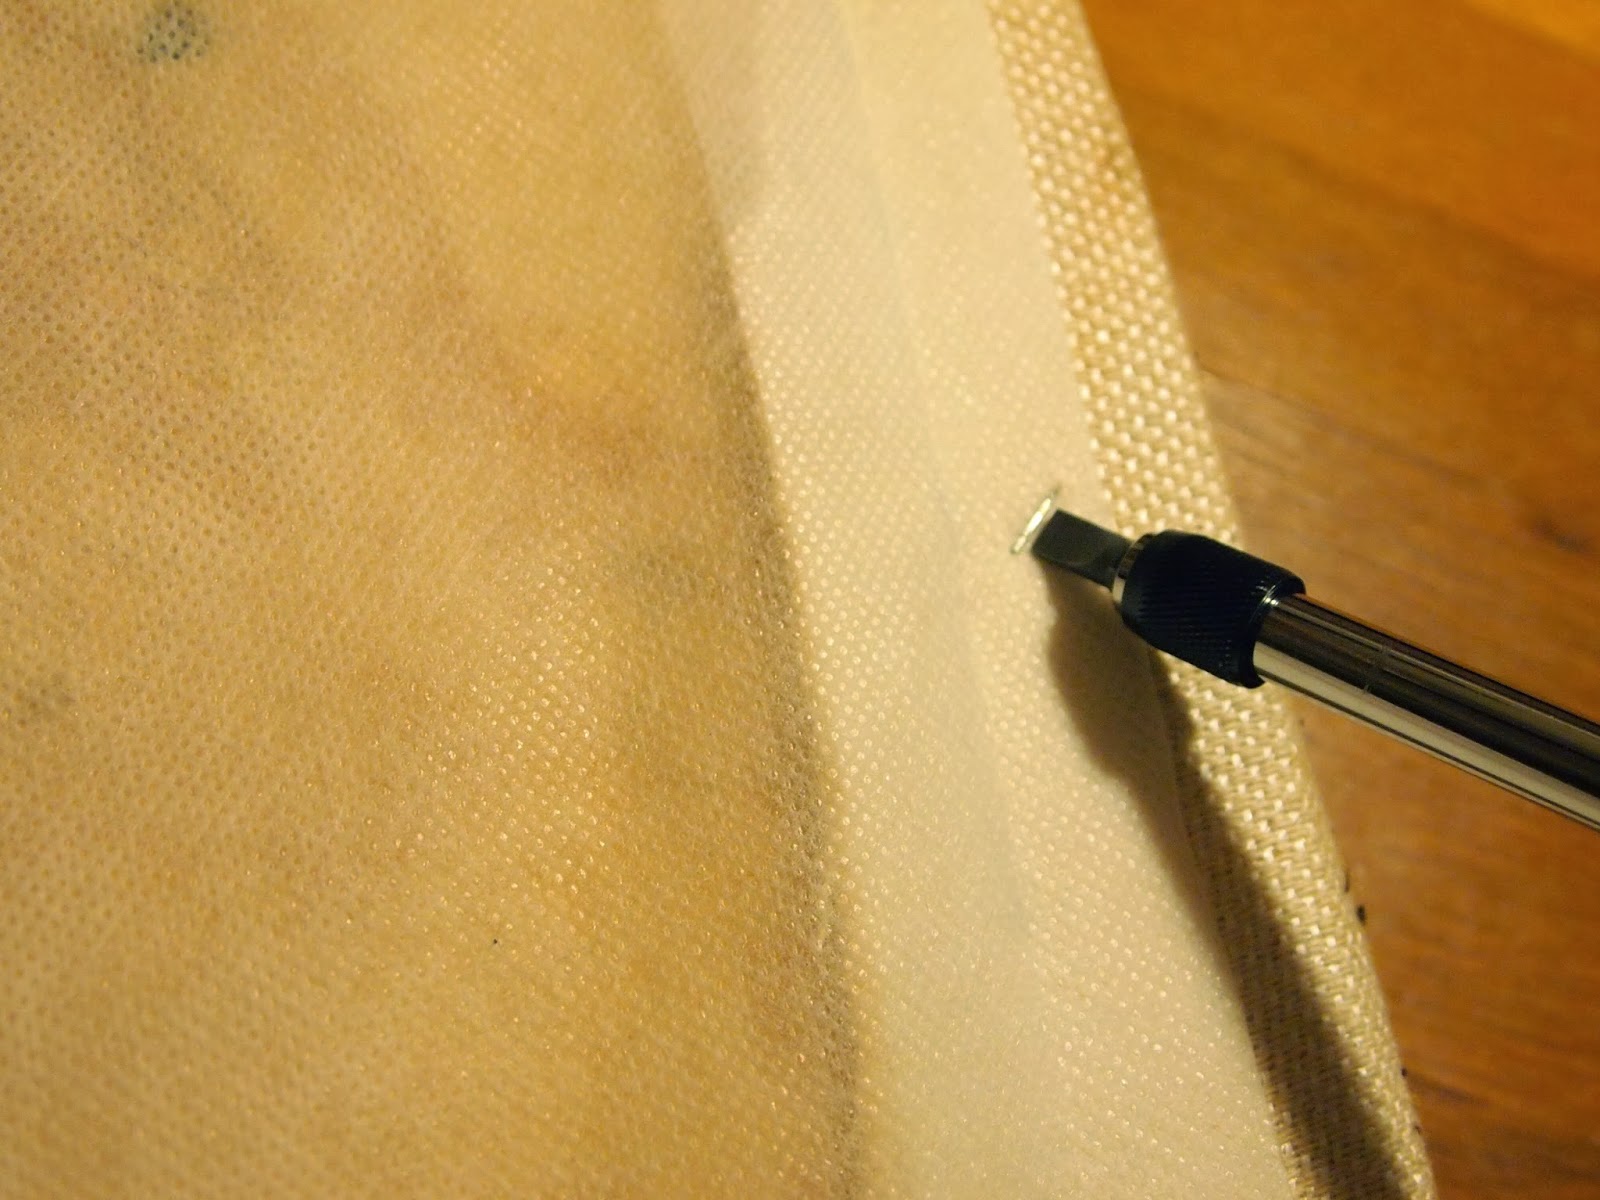
I set aside the fabric and carefully removed the old seat cover by removing the staples.
You can do this with a flat-head screwdriver or a tack remover (available at Home Depot).


Some of my chairs had foam that were in deep need of replacement. For these, I removed the foam, placed the particle/wooden board onto the new foam and traced around the particle/wooden board onto the foam.


Next, I cut out the shape.


Now, I placed the foam on the particle/wooden board, and then placed the fabric on top of the foam.
I carefully flipped this over, holding everything together.
I then stapled the fabric onto the particle/wooden board with my staple gun, making sure that the fabric was taut.


My chairs already came with a sheer fabric that I had carefully removed and set aside. I stapled this on top of my fabric onto the particle/wooden board as well.


Once this was complete, I set the seat back into the chair, replacing the screws.
I repeated this process with the rest of the chairs, and voila!


Here is a close-up of the seat.


As you can see, this was a very low-budget project and easy to do!